This is a quick guide to getting started with the FLIR ONE Thermal Imaging Cameras. The FLIR ONE camera is designed to operate in conjunction with your SmartPhone.
- Charge the FLIR ONE camera for approximately 40 minutes.
- Download the free FLIR ONE app from your preferred app store, and install it on your phone.
- Push the on/off button on the bottom of the FLIR ONE camera to turn it on. It takes about 20 seconds for the camera to start. The indicator will flash green when the FLIR ONE camera is ready.
- Connect the FLIR ONE camera to your phone. If needed, adjust the blue dial of the OneFit connector and extend the connector to fit your phone’s protective case.
- Start the FLIR ONE app on your phone.
- The onboarding of the FLIR ONE app will guide you and help you setup the permissions for the app. After that, the app is opened in Photo mode and is ready to use.
- You can use the camera from inside your home to look for cold spots, or from outside your home to look for warm spots (where warmth is escaping). You can take either photos or videos for a record – these will be saved directly onto your phone for future reference. Results are best obtained with the outside temperature below 10oC. (Obviously, the best results are obtained when there is a large temperature difference between the inside and outside of the house.)
- To turn off the FLIR ONE camera, push and hold the on/off button for more than 2 seconds.
- If you experience any problems, then please contact cameras@sustainablecalne.org.uk
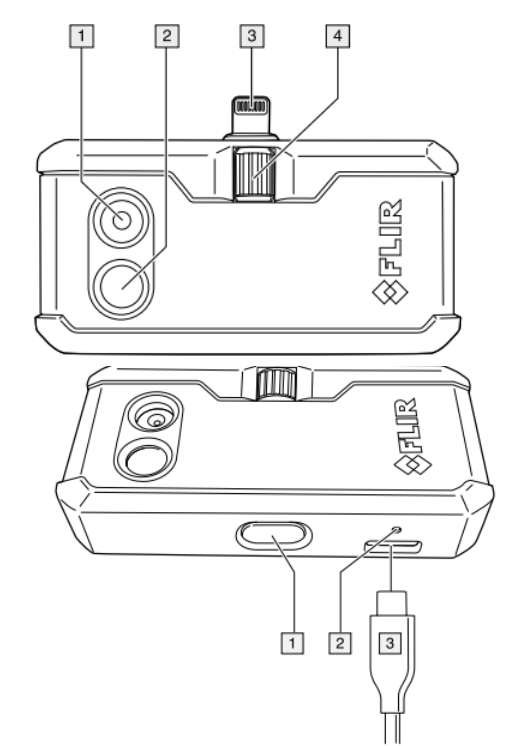
- Visual camera.
- Thermal camera
- Phone connector.
- Height control for the OneFit connector.
- On/off switch and Power indicator.
- Charge indicator LED.
- USB-C power connector
Using your photos
The photos are saved to your photos but can also be viewed within the App. If you view them in the App you can switch between the thermal image (IR) and a photo of the location(DC) so you can check which door, window, wall etc it was.
If you scroll down there is further information displayed.
No photos are stored on the camera.
Your photos will be uploaded automatically onto the FLIR Ignite cloud: ignite.flir.com which can be accessed using the same log on details that you use for the app. These photos can be analysed, downloaded and shared. Just ensure you allow enough time for the upload as these are fairly large files.
You should have been given 2 copies of the checklist. Please complete one for yourself for future reference and one to be returned so we can evaluate the project.
Acknowledgements
Sustainable Calne have set up this scheme working with Calne Town Council and we are very grateful for their support.
Calne Area Board (Wiltshire Council) and Calne Town Council provided the funding for the cameras.